One problem I have with the Foodsaver is it is not good for packaging juicy items. I'm not talking about soupy items. Anything with even a tiny amount of juice (which seems to be pretty much any moist item I want to bag) can be a problem, because the juice can get sucked up into the unit and interfere with the seal, especially if the liquid is thick or oily.
The Foodsaver is also not good for soft items. I don't mean just croissants, I mean any item which you can mash, snowball like, in your hands. We once received a stack of cookies that vacuum packaging had turned into one giant, dense, 3" high cookie (still delicious, but a little hard to eat). Vacuum packaging can be less than ideal for anything not as hard as a brick.
Speaking of bricks, that is what your vacuum sealed package is going to turn into. But not a nice, square brick. The process curls and stiffens both the item and the thick plastic bag around the item, typically resulting in a package that takes up more space while being less stackable. On the plus side, the stiffness of the bag and its contents does make it possible to turn anything you have lying around, even stale popcorn, into a lethal weapon.
But seriously, the Foodsaver is a great tool. It really can make food last 2 to 3 times longer, and can keep non-food items clean and dry for years. You just need to think about how you use it.
For example, to vacuum pack soft or juicy items, you should first pre-freeze them to turn them into hard, non-juicy bricks. I highly recommend reading the manual for hints like this to ensure success in conventional usage of the Foodsaver.
Read on for a few of my less conventional uses of the Foodsaver (see disclaimer!).
Often I'm packaging items for transport followed by immediate consumption. Not only do I not need a vacuum, I want to avoid all its aforementioned drawbacks, while using as little packaging material as possible. Two recent examples are decorated ninjabread cookies I made as gifts for Christmas, and meat-plus-gravy meal packs reheated in boiling water on a car camping trip last winter.
Per the instructions for my Foodsaver unit, I should use the "manual seal" button to halt the vacuum pump, but unfortunately there is a lag of about 3 seconds. Even with oversized bags, the brief vacuum caused my ninjabread men to suffer broken hands and feet, and allowed liquid to get sucked up into the unit for the meat and gravy packets. To completely avoid a vacuum, what I do is follow the instructions for making a custom bag: I place the end of the bag just over the heating element, but not extending over the gasket or into the vacuum channel.
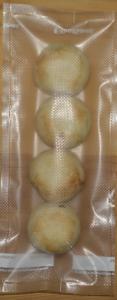
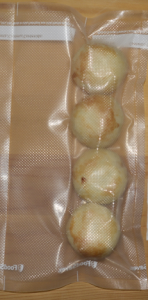
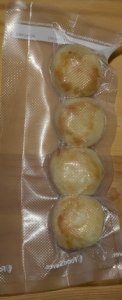
Here are some sealing examples using
manju
from the famous Sam Sato bakery
in Maui (thanks Kyle and Wendy!). Photos from left to right:
no-vacuum seal in a small bag,
manual seal in a largish bag,
manual seal in a smaller bag,
full vacuum seal in a largish bag,
and finally a close up of manju subjected to no vacuum vs. full vacuum.
As you can see,
increasing vacuum levels increasingly compressed and deformed the manju
(not shown is the vertical compression, which was comparable in severity).
The no-vacuum seal resulted in no damage to the contents,
plus allowed the smallest possible bag
(the 2nd and 4th bags were more than 2" wider than the no-vacuum bag).
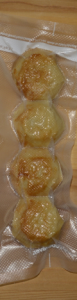
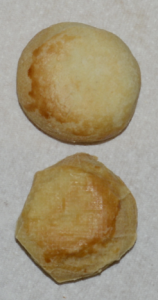
Some manju were harmed in the making of this article.
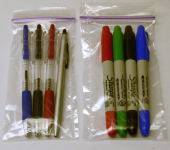 Another thing I like to do with the Foodsaver is make custom-sized bags.
For example, at the right is a zipper lock sandwich bag I cut and sealed
into two smaller bags, one ideal for some pens, and the other ideal for
some cool
Sharpie twin tip
markers (one tip fine, one tip ultrafine).
Another thing I like to do with the Foodsaver is make custom-sized bags.
For example, at the right is a zipper lock sandwich bag I cut and sealed
into two smaller bags, one ideal for some pens, and the other ideal for
some cool
Sharpie twin tip
markers (one tip fine, one tip ultrafine).
Some final tips:
According to what I've been able to find on the internet, it looks like my model 1050 was replaced a few years ago by the 2244. Looking through the new manual, in addition to the buttons being renamed ("on" became "vacuum and seal" and "manual seal" became "seal"), it appears they have improved the "manual seal" operation. Now you can simply press the "seal" button to seal without turning on the vacuum pump (this wasn't clear from the manual, but is evident from the lack of noise on youtube video reviews). They have also changed the locking mechanism; now there is only one lever on the right hand side, which you must manually release after sealing. I think I prefer the mechanism on my 1050: there is a lever on each side, which seems more secure (and possibly less stressful on the gaskets), plus the latches release automatically after sealing is complete.